Upscaler Comparison
This page compares the OSSC to the XRGB Mini Framemeister, as they’re overall the best options for playing classic consoles on newer TV’s. I also compare a cheap SCART to HDMI adapter, a more complicated OSSC solution and an RGB to Component cable from HD Retrovision, as it’s a no-lag, cheap alternative (provided your TV and console are supported). I recommend you read the main upscaler page before proceeding, just to get a basic idea of what you’re about to read through.
Skip to the end:
I imagine this page could be a bit overwhelming to someone just starting out in retro-gaming, so I’ll “skip to the end” and give my short conclusion first. I strongly recommend everyone read the whole page before deciding on a purchase though:
– If you’re just looking for a good, cheap solution to playing classic consoles on your HDTV, do a 240p compatibility test and see if the HD Retrovision cables will be a good solution for you. Zero added lag.
– If you don’t mind investing a good amount of cash into your retro-gaming setup and want a hassle-free solution, simply get a Framemeister (links to the right –>), SCART to Framemeister adapter, English remote overlay (if you can’t read Japanese), SD card and FireBrandX’s profiles. 1 – 1.5 frames of lag added.
– Regardless of the scaler you choose, you’ll need the same console RGB cables, mods, switches, etc. The only difference is the final cable going from your setup into the scaler (and even that might be the same). Feel free to follow the RGB guide for either.
– If you want to be on the cutting edge of what’s out there now and enjoy tinkering with your setup, look into the OSSC. By itself, it might be the perfect device for your setup, or might require more equipment to work properly…but with some work, it’s got the potential to be the best, lowest-lag solution. Depending on the final solution, 0 – 1 frame of lag added.
Which upscaler is right for your needs:
Before we go into options, I need to stress something: The most important thing about gaming on a flat-screen is the TV itself. The best upscaler in the world won’t fix a bad TV and lag is going to be a major issue. I’ve tested a bunch of flat-screen’s and the best I’ve seen so far averaged about 2 frames of lag. I even tested one of the new Vizio TV’s that claim to have less then one frame of lag, but that was a lie; Tested and proven, 2.5 frames consistently. I’m hoping to compile a list of TV’s 40″ and up that are low-lag and as soon as I find one that’s consistently under 2 frames, I’ll post here. For now, the best thing to do is check the forums and trust people who’ve done a CRT-comparison, like the ones shown below. Anything else doesn’t seem to be as accurate.
As an FYI, there are some zero-lag gaming monitors, but they don’t seem to get larger then 27″. Here’s a few examples from people in the retro gaming community that have personally verified the lag:
https://www.amazon.com/gp/product/B00B2HH7G0/
https://www.amazon.com/gp/product/B00RORBPCO
Cheap & Easy – The HD RetroVision Component Video Cables:
If…and this is a huge “if” that will be explained below…if your TV is compatible with 240p and has a good scaler, you can get decent performance and no added lag from HD Retrovision’s component video cables. At the moment, they’re only available for the SNES multi-out and Genesis 1 / Genesis 2 AV ports, but that covers SNES, NES (if modded with a multi-out), N64 (if RGB modded), PAL Game Cube (not NTSC), Genesis 1 – 3, Master System and anything modded with a Genesis 2-style port. Please read on for details:
240p Compatibility
The first issue is if your TV will accept a 240p signal through component at all. One easy way to test, would be to play a PS1 game through a PS2 using it’s component video cables. A better way would be to test your system directly and luckily, you can simply use composite video out from your console to test. HD Retrovision has a good guide for this: http://www.hdretrovision.com/240p/#test
How is 240p processed?
Unfortunately, just because your TV accepts a 240p signal, doesn’t mean it will look good. Most 1080p TV’s will stretch the image, since 240 isn’t an integer scale of 1080 – If you’re unfamiliar with these terms, please read this short section, as it should explain everything: http://www.retrorgb.com/240p.html#upscaling Another issue is some TV’s process 240p as 480i, which means you’d get an ugly, flickering image. The best way to check is just to try for yourself and see. Here’s some results from my testing, that are good examples of what you might find:
Panasonic 1080p GT25 plasma – Honestly, I was shocked at how good it looked. The TV processed the signal as 240p and the image didn’t seem stretched too badly (black bars on top & bottom, sharp edges). Since the cables don’t add any lag, all I had to deal with was my TV’s inherent lag which averaged about 2 frames. While the image wasn’t as sharp as through an upscaler in 1080p, I was happy with the solution:
Seiki 4K SE39UY04 – I was hoping since this TV was 4K, it would be a great solution because of the integer scale from 240p. While the cables were compatible, the TV processed it as 480i. You can clearly see the difference in sharpness between the two pictures and how ugly the “480i” processing looks. Also, this TV averaged 5 frames of lag. Five. Frames. Ugh…
I’ve tested on a handful of other TV’s and had mixed success. Many TV’s weren’t compatible at all. Some 1080p TV’s stretched the image to the top and bottom of the screen, resulting in an improper aspect ratio. One Sony 4K TV looked absolutely perfect and it’s internal scaler did an excellent job processing the 240p signal…but wasn’t compatible with the SNES, only the N64.
Conclusion:
My conclusion on these cables is simple: If you’re looking for a zero-lag, inexpensive solution, test your TV’s component input; If it’s compatible with 240p and does a good job scaling the image, you can’t go wrong with these.
XRGB Mini Framemeister – The current standard for retro-gaming on a flat-screen TV
At the moment, the Framemesiter is overall the best scaler for retro gaming: It’s readily available, works on all TV’s and when mixed with FireBrandX’s profiles, is simple to use. The other solutions listed on this page have a ton of “if’s” involved before purchasing, however there’s only two “if”s” with the Framemeister: Cost & 480p.
Cost:
The Framemeister itself is expensive, but it requires a few more things to function properly. First, it requires a SCART adapter, as the one it comes with is JP21 (looks like SCART, but isn’t). Next, unless you can read Japanese, you’ll need a new overlay for it’s remote control that’s in English. Finally, you’ll need an SD card to store the pre-configured profiles. At this point, it brings the total cost of the Framemeister to around $400. That’s quite an investment.
480p:
While the Framemesiter does an excellent job processing 240p in all scenarios, it’s current firmware has issues with 480p. I asked Fudoh to describe the issue for me, as he always has a way of putting things in good perspective:
It’s got a sampling problem on the horizontal axis, which causes vertical edges to show some kind of “false contouring”. This a a bit reduced on the RGB input (when using a 480p RGBs source) compared to the component input. 15khz input signals (240p or 480i) don’t show this problem. when you know what to look for it can really bother you. You can mask the effect by increasing the H_SCALER setting to make the edges more blurry, but compared to a good 480p upscaler the FM is really weak.
Also, FireBrandX sent me an example of the issue, that clearly shows the blurry false-contouring in 480p: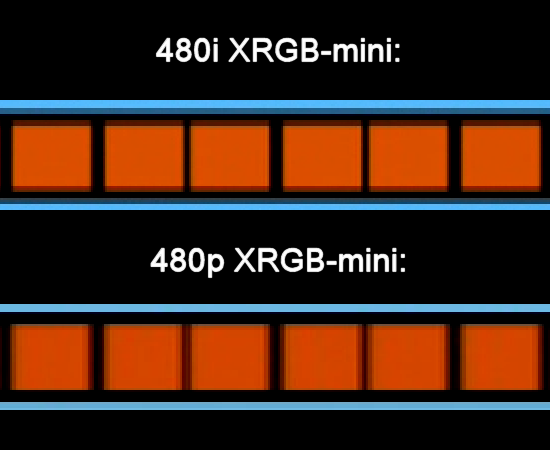
Framemeister Conclusion:
Other then the two described issues, the Framemeister performs well and it’s 1 – 1.5 frames of lag is acceptable, provided your display doesn’t have too much lag already. The only other important tips when using a Framemeister:
– Follow FireBrandX’s instructions very carefully!!! It takes a few minutes to set everything up properly, but after you do, simply selecting his pre-configured profiles will provide you an excellent experience for pretty much every console: http://www.firebrandx.com/framemeisterprofiles.html
– Check out 4x vs 5x scaling and how it applies to your setup:
If you don’t plan on using scanlines, I suggest using the 5x profiles for both 1080p and 4K TV’s, as it cuts off the areas on the top and bottom that were normally unused for CRT overscan compensation. The only downside of this is the scanlines don’t line up properly.
If you do want scanlines, use a 4x scale for 1080p TV’s and use a 720p setting for 4K TV’s. 720p will fill a 4K TV’s screen top-to-bottom and keep the correct aspect ratio. 1080p / 4x will leave black bars around the entire video screen, but the aspect ratio and scalines will be correct. Below is an example of 4x vs 5x scaling on a 1080p TV: You loose very little on the top and bottom of the console’s video output when using 5x, but look how much wasted space on the top and bottom of the image is lost when using 4x. Click for full-sized:
Open Source Scan Converter (OSSC) – The new challenger!
Here’s where things get even more complicated…and potentially awesome! The OSSC is a $200 “digitizer / linedoubler” that was designed by Markus Hiienkari (marqs on the Shmups forums). It’s main function of taking analog 240p, 480i and 480p signals and converting them to digital 480p (HDMI / DVI) works perfect in almost all scenarios and ads pretty much zero lag! It also has the ability to add scanlines to all signals, adjust aspect ratio and it handles almost every type of analog signal, including RGBs, RGBHV and RGsB. In fact, if all it did was convert analog to digital with scanlines, I’d still be raving about what a handy tool it is…but it actually does much more.
My personal favorite feature of the OSSC is it’s “linetriple” mode. This takes a 240p signal and triples it to 720p with no lag at all. In a scenario such as using a 4K TV, this (in my opinion) is a better option then the framemeister, since it has less lag, is cheaper and you don’t have to buy any converters. Here’s where the trouble comes though: The OSSC triples the exact signal it receives, without changing any aspect of it, including refresh rate. Many classic consoles use odd refresh timings that aren’t totally compliant with HDMI specs, resulting in a signal that’s not compatible with all displays. Not only that, it’s been reported that some consoles might work through a display, but not others.
The latest firmware also introduced a “480p linedouble” mode, which results in a “960p” image. This is great for people who want an integer scale of 480p, however compatibility will probably be even lower then linetriple. Markus is also testing other modes and options, adding even more potential to the device!
The perfect scenario for the OSSC:
If you can find a 4K TV that’s compatible with the OSSC,’s linetriple mode and doesn’t have much lag, I’d generally recommend it over the framemeister. I tested Wes from SOG’s 65 inch Sony x80c and the OSSC performed perfectly. Even the scalines looked awesome! Here’s a scanline comparison pic to the Sony PVM he had sitting next to his LCD TV (excuse the bad iPhone picture):
The less perfect scenario:
Even if your 1080p is compatible with linetriple mode, you still run into the issue of your TV’s scaler stretching the image to fit 1080p resolution. Linedouble (480p) mode introduces a similar scenario in both 1080p and 4k TV’s, as it’s not an integer scale. Luckily, there are a few devices that can help this issue:
OSSC through another device, into your TV:
In order to maximize compatibility and scaling options, you can actually run the OSSC through another scaler or converter. This is what I’d refer to as an “experts only” solution, as it’s very complicated and some of the equipment used is extremely expensive, making the total solution much more costly then just getting a framemeister. I’ll run you through some options:
HDMI to VGA
I ran the OSSC through an HDMI to VGA converter and was able to get both 240p linetriple and 480p linedouble working! Unfortunately, my TV didn’t react well to the signal, causing a “shaky” image. Maybe you’ll have better results?
HDMI to Component
I tested the OSSC through my TV’s component inputs and it did not help compatibility at all.
OSSC through another scaler:
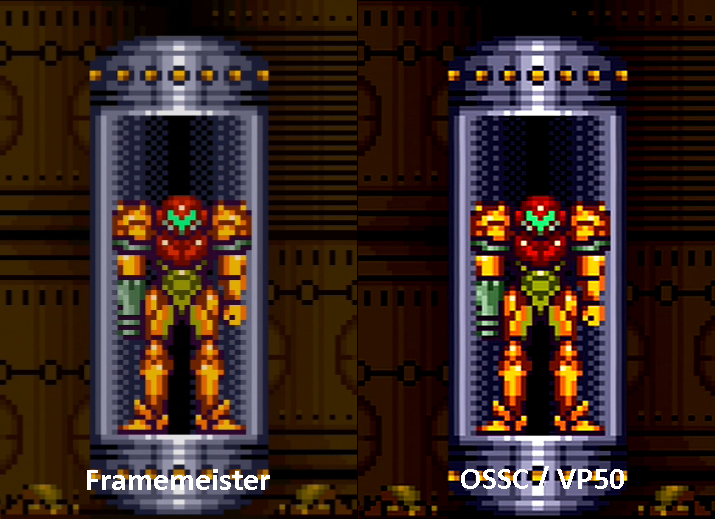
While both of the above solutions are acceptable, keeping the signal digital is a better idea. People have suggested running the linetriple mode through another scaler, both to add integer scaling to 1080p and to allow more control (zoom, etc). I worked with FireBrandX to test this solution using a DVDO VP50 and got very interesting results. Here’s what FireBrandX had to say:
“The VP50 was designed to scale SD video and not game graphics, so the “style” and filtering used may not be to everyone’s liking. Here again, Line Triple mode on the OSSC significantly reduces the influence of the VP50’s scaling function, but not entirely. The Framemeister was clearly sharper and cleaner looking in this regard.
It was actually pretty easy to experiment with the zoom settings and aspect ratio functions the VP50 offers, and the way it scales means you don’t have to worry about dialing in perfect integers. You can pretty much just set it to fill the screen and be done with it. However, they are only 10 available preset slots you can save to, so you’re in trouble if you need more than that with multiple different consoles.
I didn’t find the VP50’s various color, brightness, contrast, sharpness settings very useful with the OSSC. The default values were pretty much as good as it got. That said, the OSSC definitely has a more vibrant picture than the Framemeister.”
While I agree with his findings, there’s a few things I’d like to add:
– More expensive scalers, such as the ‘plus’ model VP50+ have better sharpness controls and may result in a better picture.
– Sadly, 480p linedouble didn’t work through the VP50 when I tested.
– Fudoh also had some input about using an OSSC with a DVDO scaler: http://shmups.system11.org/viewtopic.php?p=1194539#p1194539
– Getting the DVDO VP50 working properly was a gigantic pain in the ass!!!
Firmware Update
In order for your DVDO scaler to work properly, it needs the newest firmware that supports gaming. This requires using a PC with a serial port (the USB-to-serial adapter I bought didn’t work), using software called teraterm and following the directions exactly as written. The firmware update took about 45 minutes total.
Cadence Detection / Game Mode
You need to disable a feature called “Cadence Detection”, in order to get a low-lag “game mode”. To make things even more complicated, this has to be done after the video source is on and selected…but your video source might cause the screen to go black if Cadence Detection is on!!! This requires you to do it “blind”:
– Turn on the VP50 before turning on the OSSC.
– Go through the menus to find and disable cadence detection. Pay attention to the readout on the front LCD and write down which buttons you’re pressing, how many times, what order, etc.
– Completely exit the VP50’s menu, turn on the OSSC (in linetriple mode), then turn on your console.
– The screen will go black.
– Use the menu on the front panel to navigate the settings “blind”, to turn off cadence detection.
– The picture will come back up and your VP50 will be in game mode.
– You might need to turn off HDCP as well.
I realize most devices won’t be as much trouble to configure and set up, however I felt the need to mention what I went through, just so you’ll know what to expect. I hope to eventually find a device that sits between the OSSC and display that works like a VP50, just without the hassle.
OSSC Conclusion:
I love the OSSC and I’m very happy I bought it. It’s become a handy tool I use on a regular basis and when I eventually find a compatible, low-lag 4K TV, I think it will be the preferred scaler to use. I just wish there was some kind of “compatibility test” people could run before buying it to make sure linetriple mode will work with their display. Either that, or a cheap, low-lag device we can put between it and the display to allow compatibility.
One more thing to note is that the OSSC doesn’t pass audio through the HDMI/DVI connector. An add-on board is being made available, however I didn’t find this to be an issue on any of my displays: My TV’s allowed me to simply choose audio from a different source.
As an FYI, the OSSC doesn’t come with a power supply. If you’re in the US, I suggest this one, as it’s cheap and works perfect: https://www.amazon.com/gp/product/B00GUO5WUI/
Lag Tests:
In the above review, I listed the amount of lag from each scaler. I thought it would be good to show exactly how I got these measurements, both to prove the results and to show you how you can test yourself. I used two CRT’s (which have zero lag) to test the performance of each scaler, however this same method can be used to test the lag of a flat-screen display: Just split the signal between a CRT and the flat-screen you’re testing, then compensate for the delay of the scaler you’re using. When checking the lag of a flat-screen TV, you’ll want to try different resolutions, as some TV’s have more lag from a 480p image then a 1080p, etc.
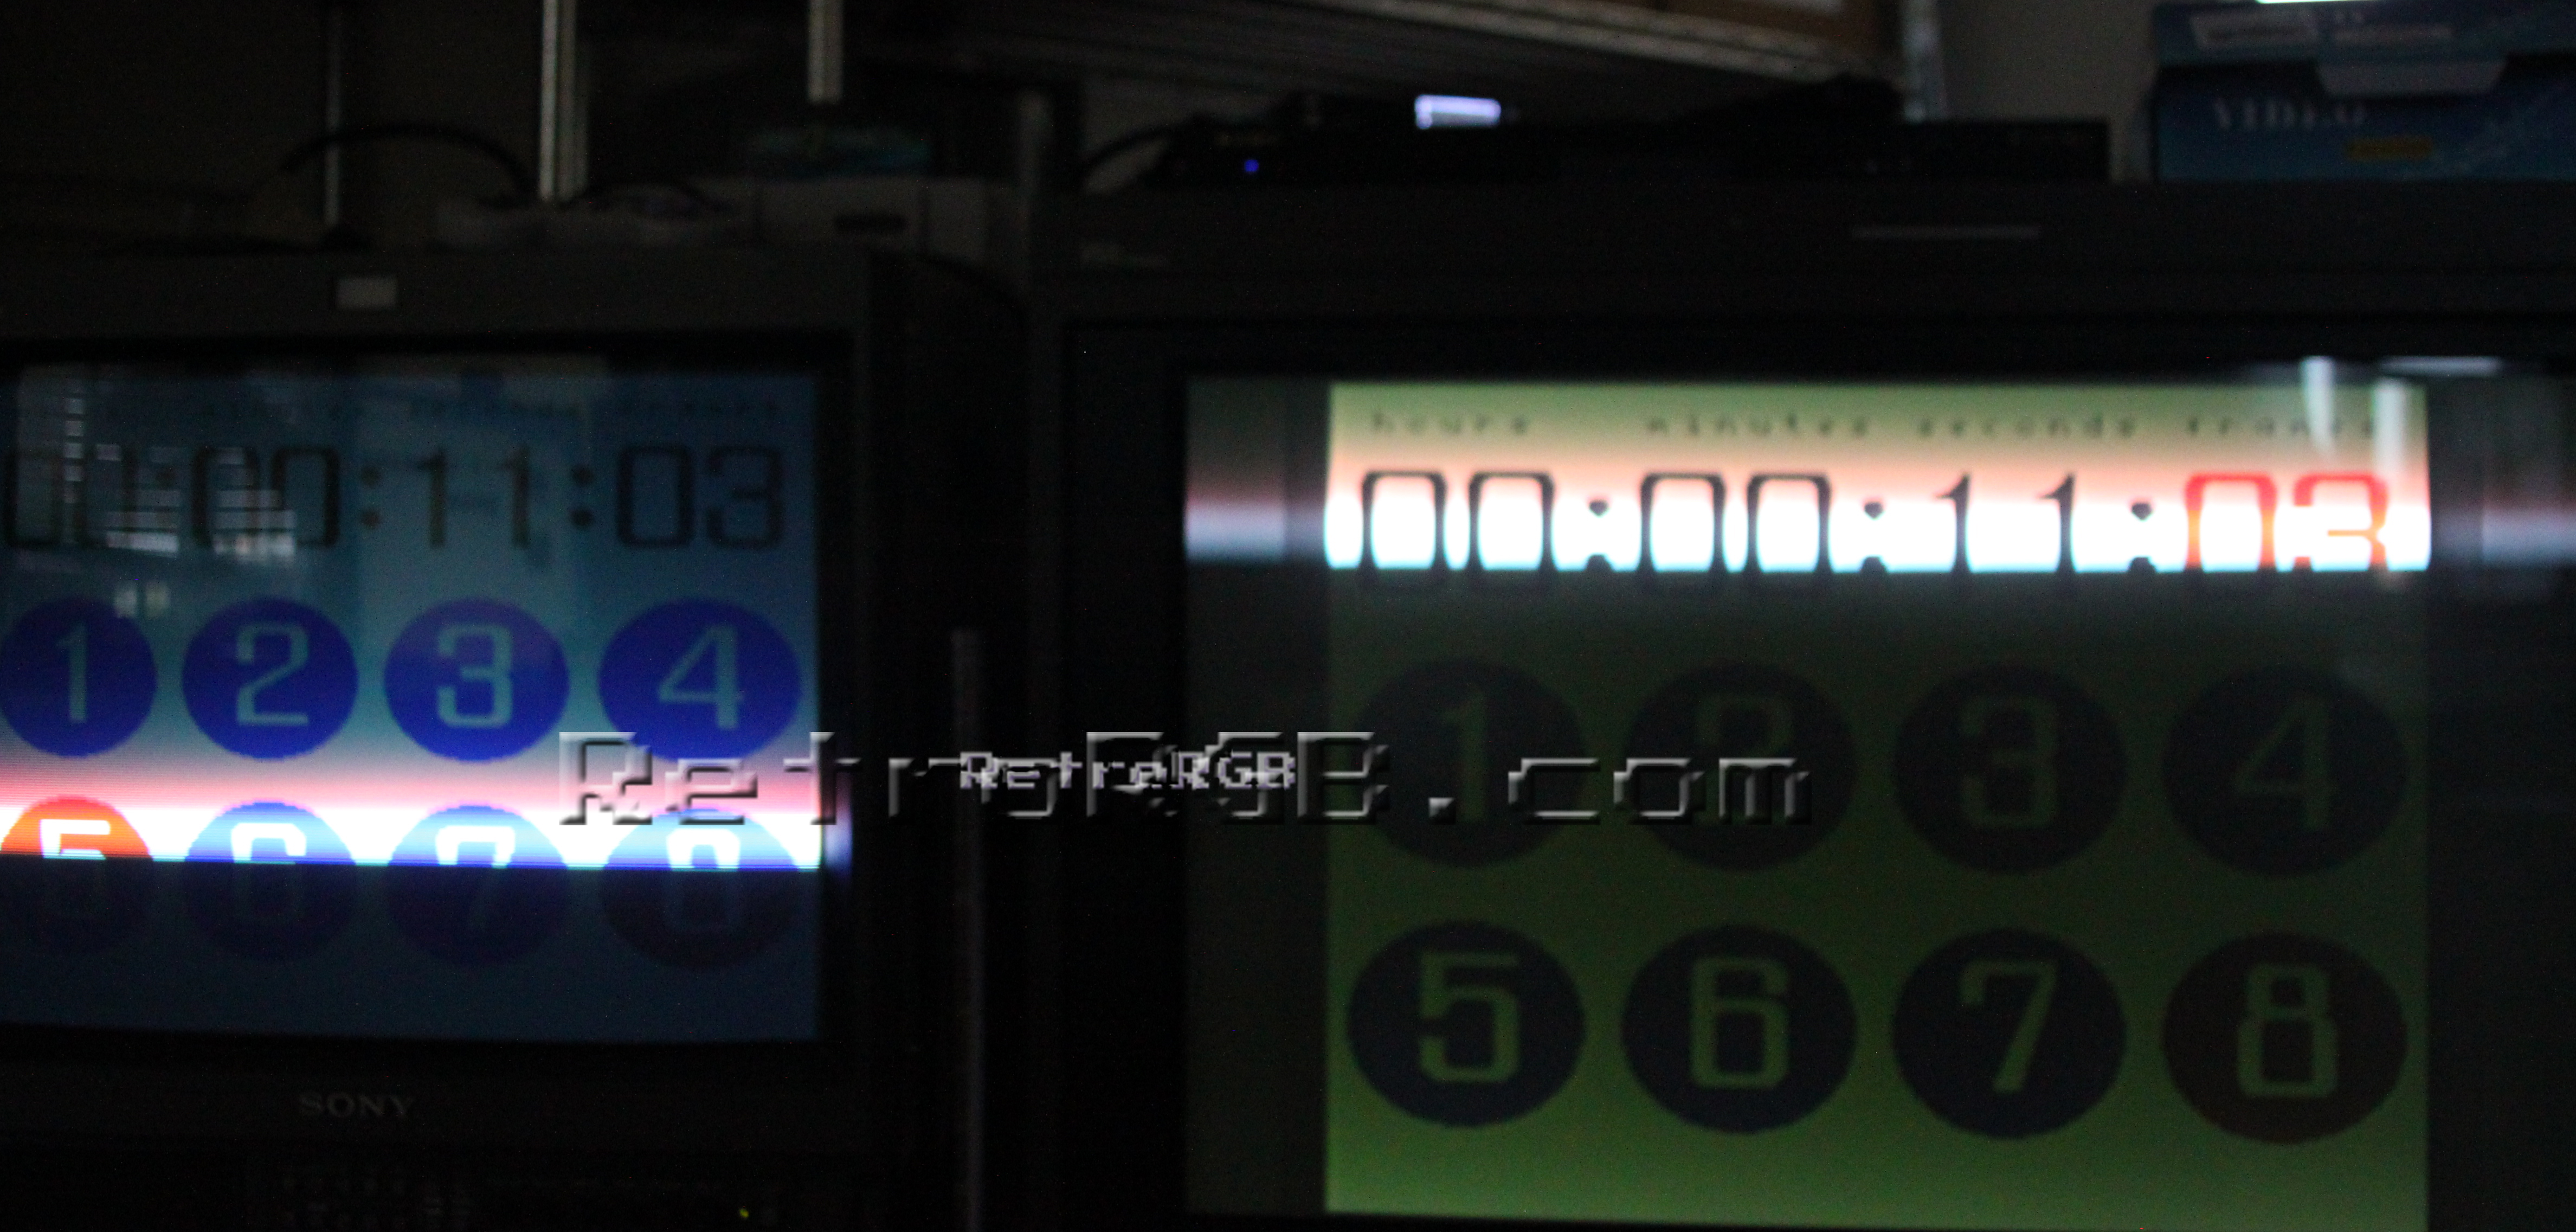
For my test rig, I used a DSLR with a fast shutter speed to take pictures of the stopwatch lag test built into the 240p test suite.

Here’s a detailed description of the different tests I performed, followed by the results of each test. As an FYI, going from the upscaler to an HDMI-to-component adapter, then directly into a CRT would work too, I just didn’t own one at the time of testing:
Test 1: One output of the gscartsw went directly into a small PVM and the other went into the upscaler. Then, the output of the upscaler was fed through an HDMI to VGA adapter, through an Extron RXi and into my Sony BVM:
Test 2: I also did a second test with each, using an HDMI to HD-SDi converter, just to make sure the HDMI to VGA wasn’t introducing any lag:

Direct CRT vs CRT
To start, I tested the NES without an upscaler; Just the gscartsw split between the PVM and the Extron RXi / RGBs BVM combination. As you’d expect, there was zero lag. Another added bonus: During all my testing, it appeared that neither the HDMI to VGA or HDMI to HD-SDi added any lag at all! That means anyone who wants to play an HDMI console in 720p on a (compatible) CRT can enjoy a completely lag-free solution!
OSSC:
First up was the OSSC and it showed just about zero lag. I was absolutely stunned! I literally took about 50 pictures just to make sure, but they all looked exactly like this. Also, settings didn’t matter at all; With or without scanlines, lindouble vs linetriple, etc. Very impressive! Click for full-sized:
OSSC through DVDO VP50:
I first ran the OSSC through the VP50 with an older firmware and got almost five frames of lag!!! Once I realized you needed to turn “Cadence Detection” off in order for it to be in a “game mode”, the results were much better though. Lag ranged from just a fraction of a frame to one full frame. I took many pictures and never saw it go above one frame though, making it less then the Framemeister (click for full-sized):
 |
 |
Framemeister:
Up next was the Framemeister, which consistently showed between 1 and 1.5 frames of lag. I was only able to test with 480p and 720p output, but both were the same.
Generic SCART to HDMI Adapter:
These are the cheap adapters sold everywhere. The quality is bad, compatibility is bad, performance is bad…but the lag is really, really bad!!! I consistently got 4-5 frames of lag. That means if you’re playing on a “good” flat-screen with 1-2 frames of lag, that translates to 5-7…and if you have a laggy TV you’ll get an unplayable 8-10 frames of lag. These things are good for things like Twitch streaming (assuming yours even works), but NOT for playing games! Here’s the exact one I bought, but I’ve seen many different ones that are equally as bad. Basically, if it’s under $100, assume it’s junk: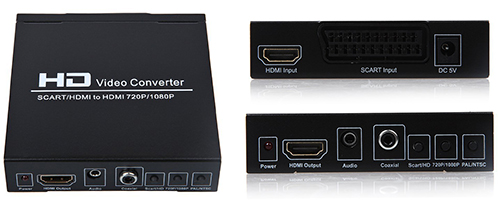
HD Retrovision SNES Component Video Cable:
Yes, I realize it is pretty silly to test lag on an analog-to-analog cable, but I wanted to be absolutely sure for myself. I ran the cables into my 20″ PVM, then ran the outputs of that PVM into the inputs of my 32″ BVM, daisy-chaining them together. I took a ton of pictures to be sure, but no surprise here: Zero lag. I seem to have lost the pictures of the test, but the setup looked pretty cool…
Overall Conclusion:
Just to reiterate what I said at the top of the page (but now with info behind the statements): If you want to play classic consoles on newer displays, enjoy tinkering and want to support a developer in the retro-gaming scene, get an OSSC. If you don’t enjoy tinkering and just want to play your old games, get a Framemesiter. If there’s ever a chance you’ll need to play SNES or Genesis via component video, get the HD Retrovision cables too. For a price that cheap (relative to everything else in the retro-gaming scene), it might be worth buying, just to keep in your “toolkit”.
Feel free to head back to the main upscaler page. If you’re here as part of the RGB Guide, please either move onto the next section: Emulators / Virtual Console, or move along to getting your SCART RGB cable into your display.