Hi-Def NES HDMI Board
The Hi-Def NES is an HDMI add-on kit for the NES created by Kevtris. It outputs 480p, 720p and 1080p via HDMI.
The Hi-Def NES is an absolutely amazing mod that allows NES systems to output high-definition resolutions via HDMI. It’s jam-packed with features and works extremely well. This page will go into detail about each of the features available, as well as show examples of each.
Hi-Def NES Installers:
Specs (more detail on each below):
* Zero lag HDMI generated by your real NES – no frame buffer
* All signals, video and audio, are all digitally created therefore noise free. No analog conversion in the kit!
* Fits into top loading and front loading NES units, as well as AV Famicom’s. More consoles are being tested, including the Sharp Titler.
* Automatic PAL/NTSC chipset detection.
* Three NTSC video modes: 480p, 720p, 1080p 60fps (NTSC CPU/PPU only)
* Three PAL video modes: 576p, 720p, 1080p 50fps (PAL CPU/PPU only)
* Four selectable palettes.
* Five scaling methods.
* Cropping on all four edges of the screen.
* Fully adjustable scanlines.
* Width adjustment to fine tune aspect ratio.
* The Hi-Def NES circuitry replaces the existing power with a more efficient design.
* Expansion audio is generated without the actual hardware in the cart, so if you have a rom with exp audio on your flash cart just turn on the option in the hi-def and it will work!
* Complete extended audio chip support: VRC6, VRC7, MMC5, N163, Sunsoft 5B and FDS.
* Realtime audio register viewer.
* Each audio channel is fully pannable.
* Countdown timer on the main menu that starts on powerup, for people timing speed runs.
* Reconfigurable hotkeys that can reset the system, overclock, underclock, and get into the menu.
* Software upgradable by using .nes file on flash cart or burned to EPROMs.
Screen Shots:
These are just a few quick shots of title screens, to give you an idea of how good the Hi-Def NES output looks (click for full-sized):


Videos:
Here are some videos of the Hi-Def NES in action. I highly recommend watching in 1080p so you get the full effect.
|
Basic 1080p video footage |
My Life In Gaming’s detailed review |
Phonedork’s Review (starts at 33:20) |
|
|
|
|
Installation Pics:
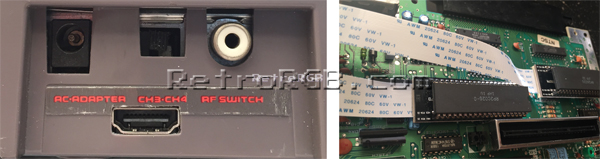
The main board itself fits under the motherboard of a top-loader, or under the RF board of the original front-loading NES:
The kit also comes with boards that sit between the CPU & PPU that connect via ribbon cable, making for a very clean installation:


Features:
The Hi-Def NES is jam-packed with awesome features! I’ll go through each menu option, explain what they do and show screenshots where necessary. Please keep in mind that these screenshots are of the menu in firmware version 2.0. Anything other then 2.0 might have slightly different options.
While a game is in progress, you can hit Select + Left at the same time to bring up the main menu. This menu also has an “elapsed time” counter that starts when the console is powered on. This is useful for people recording proof of speedruns:
The first thing you should do after powering on the Hi-Def NES is start from the bottom and select the “About” menu. You’ll want to make sure your firmware version is the latest available. If your firmware is older then the one pictured, your menus might look a bit different:
Next, check out the “Save and Options” menu. Use this to update your firmware (if its not already on the latest), but also use this page to set a very important feature: The “1080p60 height” selection:
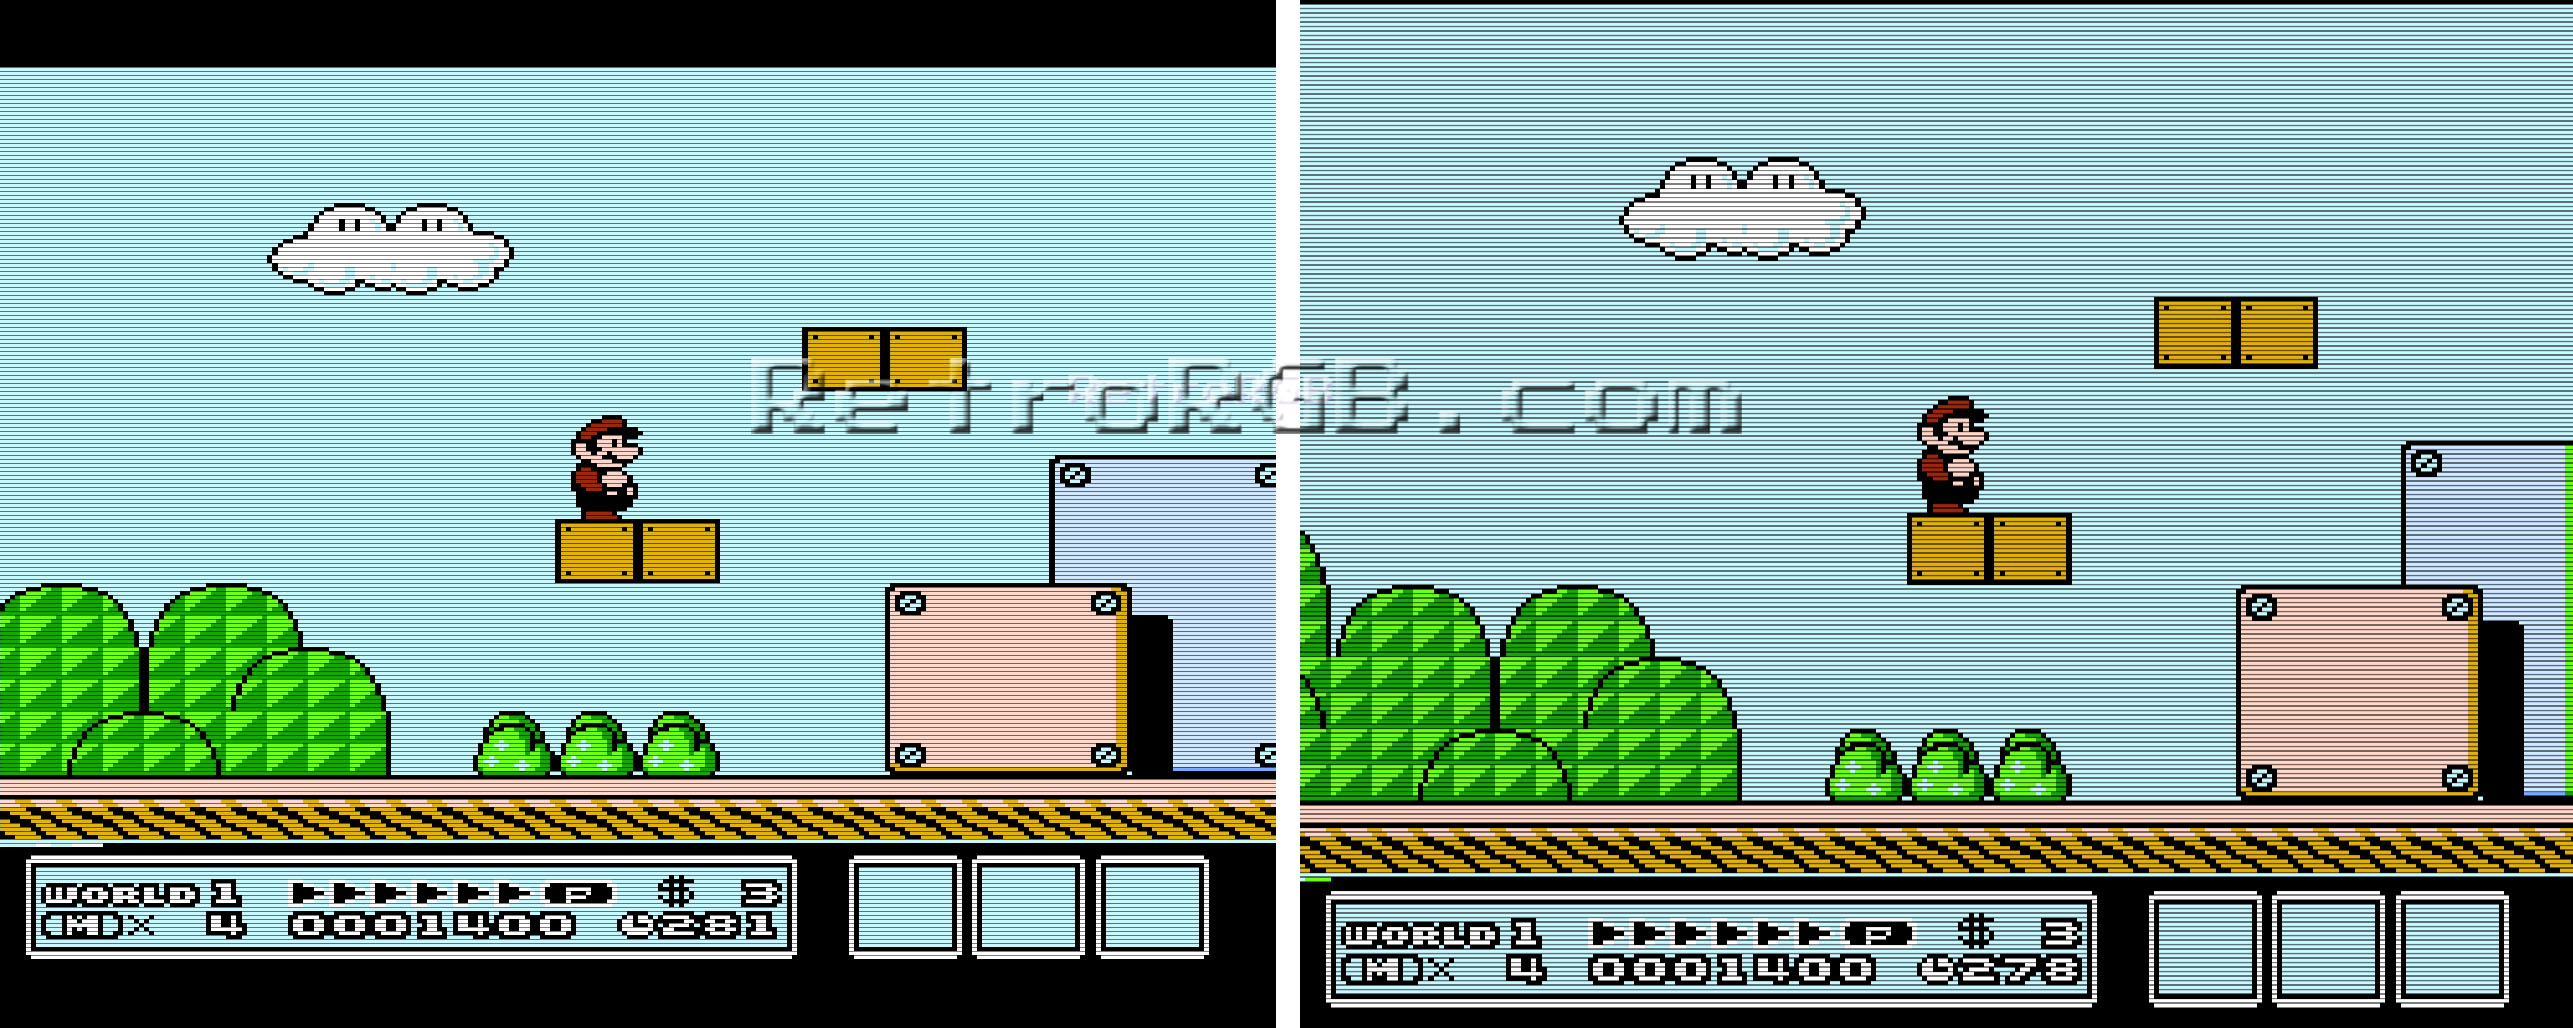
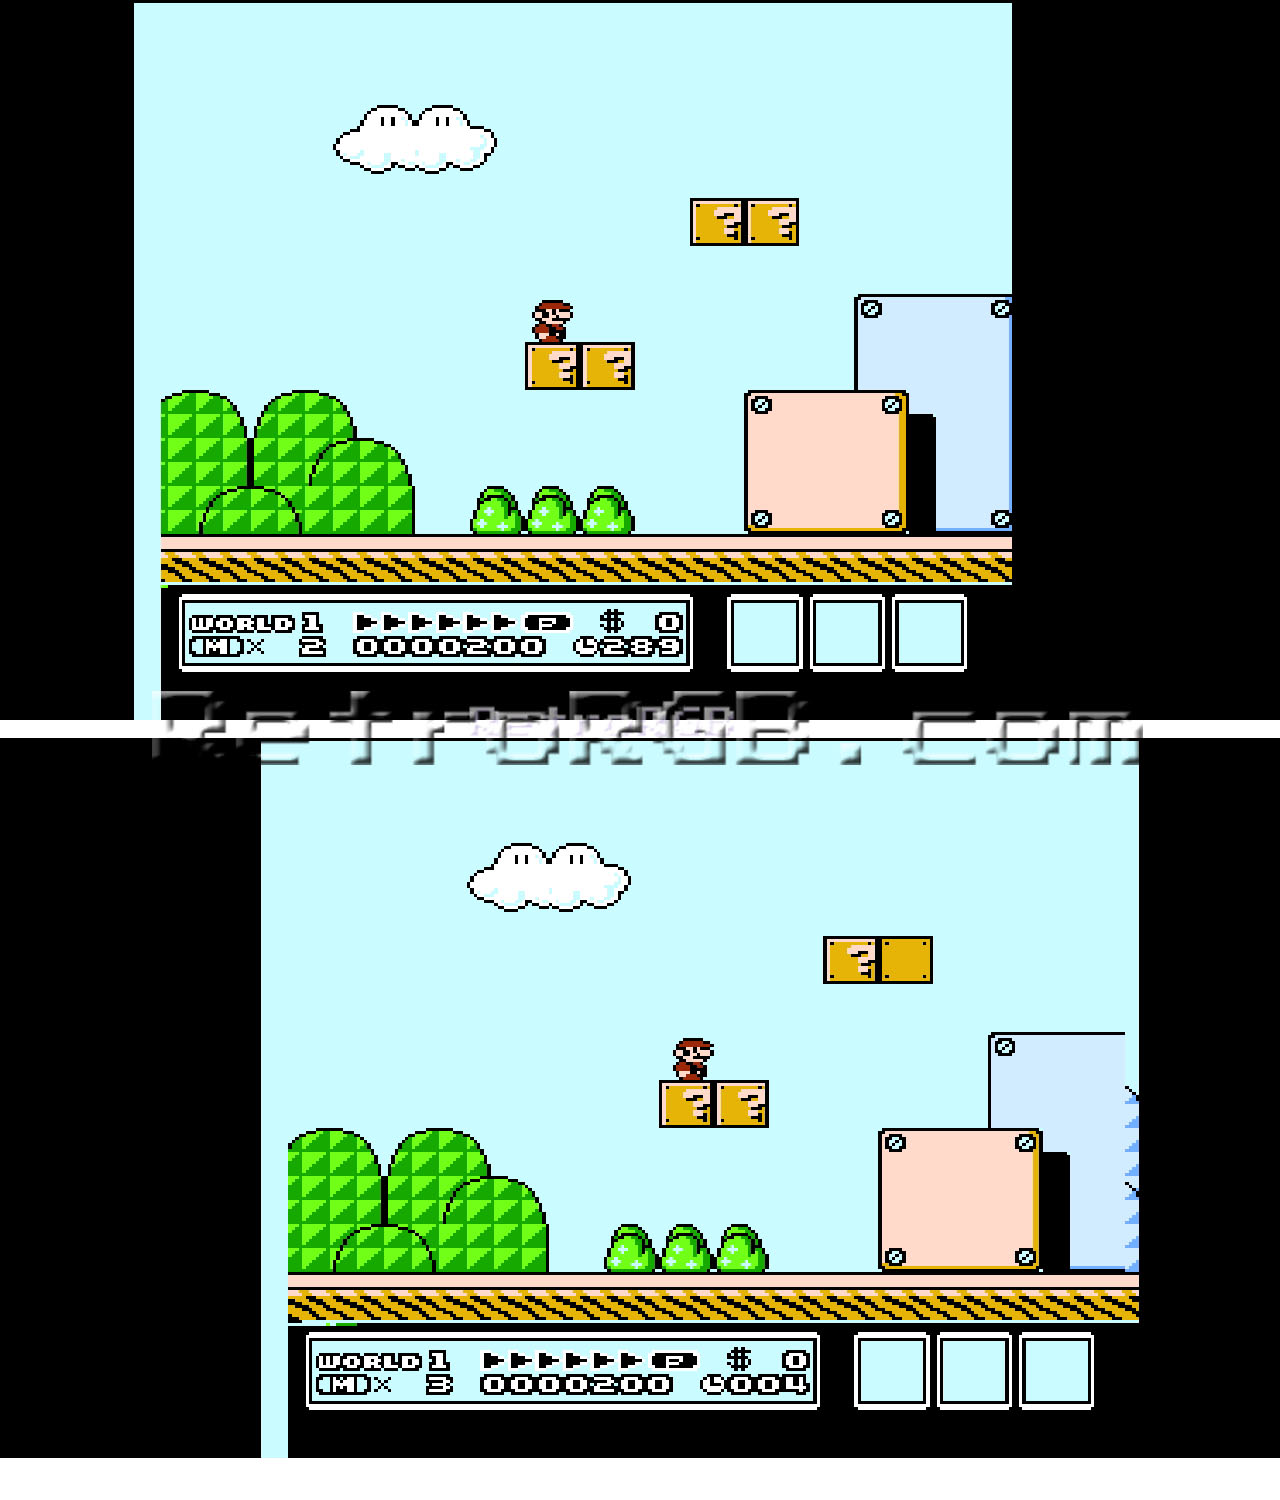
The 1080p60 height page allows you to select if the playable screen will be scaled to either 4 or 4.5 times the original size. In my opinion, people should always use 4x, as it displays the correct aspect ratio and scanlines will line up properly. You’ll get black bars on the top and bottom of the screen, but in my opinion, its well worth it (click here for more info on why integer scaling is a better option). After selecting 4x, hit B to go back, then select “save settings” from the previous menu (shown above). You’ll need to power the NES off and back on for the settings to take place:

Here’s examples of both the difference in aspect ratio and how the scanlines only look right in 1080p when scaling to 4x (click for full-sized):
Next, we’ll go back to the top of the menu and talk about resolution. The three options available are 480p (which appears to be 4:3), 720p and 1080p. This is pretty easy: Simply set it to the resolution of your display. Once you change the resolution and hit B to exit, the NES will automatcially reboot:


Video Options:
Next, we’ll talk about Video Options, which are some of the most exciting features of the Hi-Def NES. Please note that the number of video features that are on or off DO NOT increase or change the lag. The FPGA is processing everything in real time and features cannot / will not add more lag:
The first feature is horizontal stretch, which when used properly can help tweak the video output even more:
The default width is 4:3, allowing the image to stay close to the original aspect ratio. When set to 1080p, you can actually move the slider bar to the left for a perfect 5x horizontal stretch. My Life In Gaming describes this in detail in their Hi-Def NES video.
Of course, you could also use this feature to stretch the 4:3 image to the width of the 16:9 screen, but please don’t, as it ruins the aspect ratio! (click for full-sized):
The next menu screen adds options for different filters and scaling options that can be done to the games:
Each option gives the game a unique look. I prefer “none”, but the next time I play through a game, I’d like to give each of the others a chance, just to see how they compare. If you’d like to see a full 1080p screenshot of each, click here to download a zip.
The next option is scanlines – A filter that recreates the original CRT 240p look on a modern TV. Use the up and down arrows to select which scanline option you’d like and use the left and right arrows to select their depth. I prefer the “NES” setting, with the depth set to somewhere in the middle:
Here are screenshots of each scanline setting, taking in 1080p 4x (correct aspect ratio). The depth was set to 80 in each. Click here to download a zip file containing screenshots of each setting in each resolution:
Interpolation will ‘blur’ the picture in the horizontal direction. If you turn it on and crank it up and it will get more and more blurry. I don’t think this setting will really be used much but it’s in there if anyone wants to try it out. It’s most noticeable with no scaler on.
Next are the different color palette choices offered. The FCEUX palette is enabled by default, but you can choose between Beware’s, Playchoice-10 (that’s the arcade color palette) and black & white:
Here’s screenshots of each palette. Click for full-sized:
Cropping is the next feature that helps improve the look of older games on newer TV’s; When these NES games were created, they were designed to be used with CRT TV’s. Those TV’s always had some kind of overscan, which would cut off the edges of the screen. Newer TV’s display the full resolution and artifacts can appear around the edges.
Using the cropping feature can allow you to adjust each game and get rid of any unwanted side-effects, while maintaining the original aspect ratio. Click for full-sized:
The horizontal position setting is great for two reasons. First, if you need to crop the game (as shown above), you can use this feature to re-center the game.
Second, if you’re playing games for a long period of time, you can shift them all the way to each side to help reduce screen burn-in (click for full-sized):
Despeckle is designed to work around a bug found older versions of the PPU: When register 2000 is written to, it corrupts the EXT pin data, which creates speckles on the screen. By changing this setting, it will capture the pixel data at a different time, thereby avoiding the speckles. The H rev PPU seems to have fixed the problem, but G and earlier will have it. This can be seen on certain games like zelda and double dragon, but not all…and once again, only on certain NES revisions. If you don’t see speckels, you won’t need to worry about this at all and if you do, simply change the phase:


Audio Options:
The Hi-Def NES offers many audio options as well:
The chip enables menu simply toggles which of the expansion audio chips can be heard:
You can adjust the volume of each individual chip. This isn’t necessary for most original games, but comes in handy when using ROM carts, as the audio volumes aren’t always accurate:
The panning menu is something I was very excited about, as I prefer to have a slight separation of the NES’ audio channels creating a “fake stereo” effect. Many people don’t like how this makes their NES sound, but it’s my personal opinion that a small amount of separation ads a depth to the audio that I really enjoy. Here’s my audio settings, if you’d like to try it yourself:
The viewer allows you to see which audio chip is being used during gameplay:


Settings:
The settings menu offers advanced tweaks that most people wouldn’t need to change:
I combined all the hotkey menus into one picture (click for full-sized) as they’re pretty self-explanitory: Each menu allows you to choose the combination of buttons you’d use to enter the menu, over or underclock the processor and remotely reset the system using just the controller. Also, the controller selection allows you to choose which controller is the one that activates the hotkeys. Default settings are shown checked off below:
You can enable a DVI Mode for displays that may have issues with certain HDMI outputs.
EDID is an acronym for Extended Display Identification Data. Basically, the Hi-Def NES detects the highest resolution the display can handle. In rare cases, this may by incorrect and disabling EDID will allow you to force the intended resolution on any display. This is not a feature that most people would ever need, but it’s good that it was included:
By default, the audio clock gets determined by the CPU. That means if you overclock the CPU, the audio will get higher pitched and if you underclock the CPU, it’ll get a lower pitch. By setting the sound clock to sync with the PPU, you can overclock the CPU without changing the sound pitch.
That’s it for all the menu’s and options, at least for the 2.0 firmware. Any time there’s a major firmware released, I’ll make sure to update this page.


Lag:
I wanted to do a true, measurable lag test on the Hi-Def NES and needed to use CRT’s, since they have no perceivable lag. I fed the Hi-Def NES’ HDMI signal (set to 720p) into an HDMI to HD-SDi adapter into my widescreen BVM and composite video into a smaller BVM. The NES’ composite video output barely works at all when HDMI is connected, but Tepple modified his NES version of the 240p test suite so that you can at least see the stopwatch counter. After testing, it’s clear that the Hi-Def NES kit ads absolutely zero lag to the HDMI output!

Conclusion:
Simply put, I love it! I played through all of the original Legend Of Zelda on multiple TV’s and I can honestly say the Hi-Def NES is amazing. The games looked great and I love the sound options as well! For the first time ever, I can say playing NES games on an HDTV is pretty much equally as good of an experience as playing on a high-end RGB monitor. That’s pretty shocking for me to say!
Feel free to go back to the main NES page, for more info. Also, I definitely recommend checking out the NES HDMI / RGB mods page, as well as the RGB comparison pics.